Sunday, December 30, 2007

Challenge 9 - Bling in the New Year!

December 31st, New Year's Eve. It's the night everyone dresses up & goes out on the town for an all-night celebration. Well, not me anymore because really, who can find a sitter? So, I figure if I can't wear something all sparkly and fancy for New Years, my layout can. My challenge is for you to add some bling. Something sparkly. Something glitzy. Something you'd like to take out on the town. A little or a lot - it's all up to you.

Just post your finished projects to this thread by Sunday, January 13, 2008. And I've got a RAK for the bling lover! Bazzill Bling, Doodlebug Sugarcoated paper, Hambly, Stickles, Prima paintable cardstock, some Making Memories Noteworthy things and more.

Here's what we've come up with for the challenge:


Deborah: I decided to use several different types of bling on my layout. I used Stickles to accent my patterned paper and diecut, crystals, a glitterly felt snowflake, and velvet Thickers. In addition, one of my patterned papers had glittered circles.


Becky used crystals in different colors and sizes to create frames around her layout, accent the flower, and for her title. She stamped the word "adore" on the background with white Staz-on ink.

Alicia added some bling in a swirl shape, which really matches her girly dress-up subject.


Jen did a mini-book for the challenge. The cover has a jeweled word from MAMBI. She also used crystals and glitter throughout the book. You can see the complete pages of the book below:

So let's see what you've got!

Saturday, December 22, 2007

Some Holiday Eye Candy

We are so blessed to be involved with many talented people, and thanks to all of you who share your time to play with us! A couple of our friends from the HM group participated with us in this challenge to provide a little extra holiday inspiration for all of you!

Michelle Engel made this layout for the challenge. She stamped on a sheet of chipboard using versamark and then embossed the image white. She then hand cut the stamped image and popped one up for added dimension. Stamping on chipboard sheets and handcutting is super easy because the chippie is slightly thinner than that of purchased die cut images.
A very inspiring way to take a different twist on the challenge!

Amanda Johnston made this one, she painted her Christmas tree green and then stamped the circles with the Stazon. Then decorated it with the glitter glue. Great texture and so fun!
We love the work that everyone has shared with us, and hope that you will continue to play with us through the next week! And the coming New Year as well!
Wishing all of you around the world the Happiest of Holidays!!!

Wednesday, December 19, 2007

Challenge 7 MASK Winners!

Tis the season... I could not just pick one winner, so I decided to award 2 Honorable Mentions as well on this one. :) Check out the slide show to see the 3 chosen layouts (all at the beginning).

Tania - I just loved the whole look of your page and how you incorporated the mask.
Scrapperlicious - Loved all the detail you put into yours. Lovely
Didi575 - I like that you have your own clear style (and that you shared 2 with us!).

Please send us an email and I will get a RAK out to you ladies. Congrats!

Check out my Slide Show!

Monday, December 17, 2007

Challenge #8 with Layle!

Layle from Scenic Route is our Guest host for this challenge!

The technique is to stamp raw chipboard to create a custom pattern.
I have a ton of raw chipboard and I've found that I rarely use it because it requires getting the paint out, letting it dry, cleaning brushes, etc. Using stamps is an easy way to spice up chipboard in about half the time that painting takes. I used Scenic Route Berkely chipboard letters and our Raw Star Shapes and Rhonna's Swirls Acrylic Stamps by Autumn Leaves. I like to use Stayz On Black Ink when I stamp on chipboard because it coats evenly while still maintaing a nice crisp look to the stamped image.
Since I used a piece of paper from our Loveland collection, for the RAK I'll do one of our Loveland Product Kits and some raw chipboard.
Layle
Alicia used a foil pen to color her stars and then stamped clear swirls to give them a little extra kick.
Deb painted, and then stamped hers, and also used some embossing powder to give texture


Jen painted and stamped as well, simple and beautiful.


Becky stamped on the raw chipboard.


We know that you are crazy busy with the holidays, but with this terrific time saving techinique, you will be saving memories and sanity!
Thanks for playing!

Tuesday, December 11, 2007

Another Guest Host coming!!!!

We have a guest host next week that you will not want to miss!
Trust us when we say that you will "Loveland" her!
Also, you have until Midnight on Sunday to post your projects from the mask challenge, so there is still plenty of time to play!
Please post your links, we want to see EVERYONE sharing their work!

Saturday, December 8, 2007

Winner from the Teresa Collins challenge...

Is Anilu! Buttons on the glittered tree, wonderful pictures and a clever color scheme!
Thanks for playing and sharing your work with so many, such an inspiration!
Please e-mail us!
A box of goodies from Teresa is yours!

Thursday, December 6, 2007

Challenge 6 Slideshow!

We received some fabulous entries for this challenge by our guest host, Teresa Collins. I'm grateful that it's not my job to choose the winner this week! Here's the layouts ...


Need a little inspiration?


Here's another way to use a mask - Tim Holtz style. Check out this tag and Tim's blog here.Tim used a mask, mixing his own spray solution for his tag from Distress Ink, Perfect Pearls and water. Tim's doing a "12 Tags of Christmas" focusing on a different technique for each (and, honestly, you can pick up multiple techniques from each tag). Some really good stuff - he's the master!

Check back later today for our slideshow from Challenge 6!

Sunday, December 2, 2007

Challenge 7 - Use a Mask

Ok, everyone, I know that Halloween is done and the candy is (probably) gone, but I'm giving you one more chance to use those masks.... scrap masks, that is.

Masks are very versatile. Many of you probably own them (like the ones Heidi Swapp makes), but if you do not have your own stash, fear not! They are super easy to make also. Some ideas:

* Lightly stick some stickers (letters or shapes) on a page and then ink over them. Remove the stickers and voila, you have used a mask
* Print or draw a shape unto cardstock or a transparency and cut around it. Put non-permanent sticky stuff on the back of the shape (like a photo corner) and then place it on the layout. Ink and then remove the shape. Easy as pie.
* Use a punch to make a shape and then use that shape as suggested above. (That is what I did on the upper right of my layout)

Remember that all kinds of mediums work with masks... Stamp ink, paint, chalk, crayons... sky is the limit.

As always, show us what you've got. You have 2 weeks (until Sunday, December 16th) to post your creation. It can be a layout, a card, a project... whatever. Have fun! Link here or at the posts at http://www.scrapbook.com/ (in the challenge section) or at http://www.twopeasinabucket.com/ (in the pub) to be considered for a RAK.


We are also very pleased to bring you our first FEATURED ARTIST for this challenge. Please welcome Sherry Steveson to Method Playground. Sherry is a fellow HMer and is author of two books: "When Life Gifes You Lemons; turning sour photos into sweet layouts" (coming out in the Summer of '08) and "The Scrapbooker's Embellishment Handbook" (coming out in the Spring of 2009). Check out her blog at: http://sherrysteveson.typepad.com/my_weblog/. We are thrilled to have her play with us!
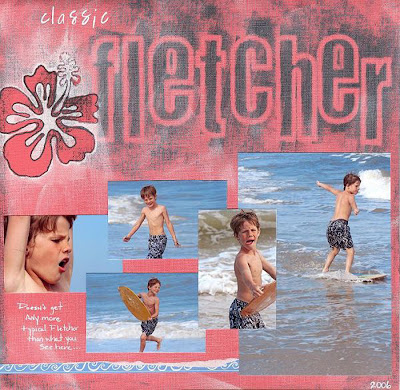
For Sherry's layout, she used Heidi Swapp mask letters and a flower. Using black paint, she covered the masks so that the black highlighted the letters and flower. She then used white stazon ink and covered the entired title to 'soften' the look. She rounded out this page with multiple photos of her son Fletcher in classic moments and tore Heidi Swapp tape to embellish.


For my (Jen's) layout, I used two different mask techniques. For the flowers, I used a Heidi Swapp mask and painted around the flowers with pink acrylic paint. I also made a homemade mask in the upper right by punching out circles of scrap paper and temporarily adhering them in an arc with photo corners. I then painted over them with acrylic paint before removing them.

Alicia 
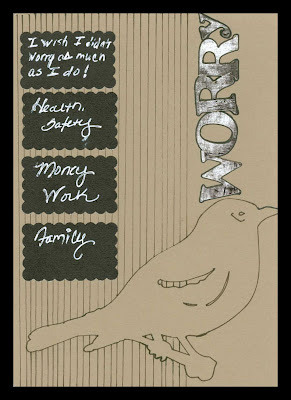
went a whole different way with her project. She used a Heidi Swapp Mask and drew lines with a thin black marker to make the outline appear in her mask. Her “layout” is actually on an XL Heidi Swapp playing card.

Becky's Layout: Becky masked the title with Heidi Swapp mask alphas, and painted over in silver, the red paper is also masked in photoshop with snowflake brushes and then printed out onto extreme boy patterned paper.
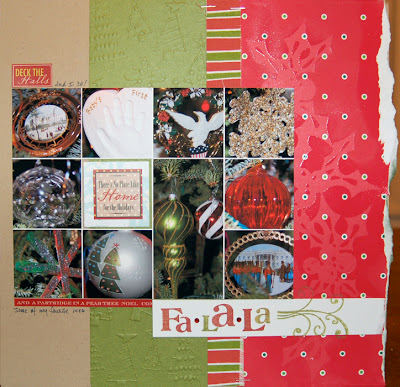
Deb's Layout: Deb also used a Heidi Swapp mask (of holly berries) on the piece of red American Crafts paper. She covered the whole piece with versamark, lifted the mask, and then embossed with clear embossing powder.


Wednesday, November 21, 2007

Challenge 5 WINNERS

Alicia has picked her winners for the Dress it Up Challenge, and here they are:

(1) Yuko – Alicia loved how she cut the patterned paper and she loved the simple chipboard design (and who can resist that cutie!)

(2) MegaMay- Alicia thought the photos were outstanding and said the elements you chose to dress up really made them stand out even more.

Congrats to both of you. Please email us (the link is on the right) and let us know where we can send your goodies!

Challenge 5 Entries!

Sunday, November 18, 2007

Challenge #6 - from our guest hostess, Teresa Collins

Teresa has come up with a simple but very fun challenge!

Technique: Glitter up your Chipboard
Theme: Grateful For...

Project technique:

I was excited to be invited to do a project for the Method Playground blog. I love to incorporate simple, but stunning techniques into my projects. I absolutely love glass glitter and how it shines. I wanted to do a challenge with a "GRATEFUL for..." theme since it is almost Thanksgiving. It gave me the idea to cover the number 4 with the silver glass glitter.

I used a raw chipboard number 4 and adhered Elmer's glue to the surface.

I applied the glass glitter over the glue and allowed it to dry.

It is simple and easy to create your own glittered chipboard!!!!

If you would like to seal the glitter (so that it will not shake off), apply a even layer of Glossy Accents by Ranger to the chipboard. Allow several hours for the liquid adhesive to dry. Project theme:

I decided to do a layout about something that I am grateful for.

There are so many things that I could do...but what kept coming foremost in my mind is my teenage daughter Taylor. My husband and I recently went on vacation this past month, and while we were away Taylor was involved in a terrible car accident. Her car was totaled and since we were on a cruise, she could not contact us. When I found out about the accident, I was devastated. I was overcome with gratitude and felt blessed that she was not hurt. All I could do was say prayers of thankfulness for her. So I wanted to document, just how grateful and thankful that I am.

Have a great Thanksgiving-

much love


Here are the Playground Girl projects that were inspired by this challenge. Jen used the glitter on the little dog chipboard, notice the green visual triangle, so clever and cute! Alicia used the inspiration to start a great family tradition! What a beautiful album! Don't you love the chipboard dates! Deborah used the glittered chipboard to accent the colors in the layout, gorgeous! Becky used Tattered Angels glimmer mist in peach on the Maya Road chipboard and then accented with Art Glitter in Aztec Gold.

Hope you have fun with this challenge!

B-


Saturday, November 17, 2007

Two more days to submit to the Dress it up Challenge!


Happy Saturday fellow Method Playgrounders! Two more days to submit your entry into the Dress it Up Plain Jane Challenge. Will be picking two winners this round with awesome RAKS going out from Paper Trunk!

I have a little treat for you today... We have a special guest submission from a Brand New Creating Keepsakes HALL OF FAMER!!! Please give a warm welcome and congratulations to Barb Pfeffer!


Barb used a plain JUMBO brad and stamped on it with Staz On ink!

Friday, November 16, 2007

Teresa Collins is next Monday's guest host!

We have another guest host for this coming Monday, and we hope you will have some time to come by and play!
The super sweet and wonderfully talented Teresa Collins will be giving us our challenge, and we are really looking forward to it!!!

We hope everyone is having a beautiful fall and enjoying all of the challenges!
We have certainly enjoyed the creativity being shared with us, and are so very grateful for the support!


Blessings!

B-

Saturday, November 10, 2007

Challenge 4 - Winner!

Ali has chosen a winner for her micro-beads challenge. The winner is...

Amadia (a.l. clark) for her layout "Trying to Fit In." Amadia will be receiving a copy of Ali's newest book, Life Artist.

Please email us (click on the email link at the right) and let us know where to send your book. Congrats!


Friday, November 9, 2007

Challenge 4 - Slide Show!

We were again blown away by everyone's work. Thanks again to Ali Edwards for a terrific challenge. Without further ado, here are the layouts:


Sunday, November 4, 2007

Challenge #5 - Dress It Up...Plain Jane!

Alicia's Challenge #5 - Dress it up-Plain Jane.

For this week you need to dig out all those plain Jane boring embellishments and get ready to Dress them up!

Cover them, paint them, sew them - it's up to you.

Feel free to complete a layout (in any size) or a home décor item, card, etc.

We have 2 RAK’s going out for this challenge both generously sponsored by Paper Trunk. RAK #1 is a 16 sheets of double sided paper and a complete set of acrylic alphabet stamps from the Cheeky Line! RAK #2 is another Clear Acrylic Stamp Set (Alphabet/numbers and Dingbats) Esquire(see photos) *Remember you have until November 18th to complete this assignment.

For my layout posted below, I used plain silver Making Memories circle tags and painted and distressed them. Inside of each circle are plain colored buttons that were dressed up by painting on them with a paint marker and also using rub-ons. The square with the journaling inside was a raw chipboard piece that was painted and made to look like it was stitched around the edges.


Jen's Layout: For my project, I decided to do a mini-book because I just could not get enough of those yummy Paper Trunk papers. Seriously, folks, they are awesome. Thick, textured, 2-sided papers. Colorful on one side and plain on the other. Go check them out! http://www.papertrunk.com/


For the "dress it up" challenge, I chose to embellish a plain chipboard scalloped circle with ribbon. I used several pieces of ribbon (to make it easier to work with) which I taped to the back of the circle, wrapped around the circle and then adhered at the end. I also dressed up some plain felt flowers with puffy paint.


Deb's Layout: Deb added rub-ons to a strip of cardstock and patterned paper and beads to chipboard.


Now it's your turn. We know you have tons of embellishments (don't we all?) so dress 'em up and show us what you come up with. As always, you can link here or at the threads started at http://www.scrapbook.com/ (in the challenge area) or at http://www.twopeasinabucket.com/ (in the pub).

Thursday, October 25, 2007

Winner of the Sew a Frame {challenge #3}


This layout by Shannon Taylor was selected as the winner for Sew a Frame {challenge #3}
She did a beautiful job of creating a frame that complimented the picture, the colors and the overall design. It is a layout that you gives you so much to look at, but is elegant and and adorable.
Also, if you look really closely, you will notice that in her handstitching, she tucked cute little beads between each of the stitches, a detail that has inspired me to try something new, thanks Shannon!
Congrats to Shannon, and thanks to all of you who played, we really appreciate you!!
B-