Showing posts with label Paint. Show all posts

Saturday, December 26, 2009

Challenge 58: Make it messy

One of my favorite things about creating is experimenting with different mediums. For this challenge I want you to do just that. Choose a wet medium (acrylic paint, glimmer mist, watercolors, ink, tea, even children's bubbles with dye in them works!) and then drip, splash, or splatter that medium on your project. Have fun making a mess!!

Jennifer: I mixed water with acrylic paint (equal amounts) and dripped some of the mixture onto the layout. Then I took a straw and blew the puddles in different directions. It looks a little like a blood bath (oops!), but it sure was fun to do. :)

Helga

I mixed water, distress ink, and perfect pearls to mist my background paper.

Kimmy: I used this technique on the cover of a mini album I made my dad for Christmas. I spritzed the background with red & blue glimmer mist (over the skyline mask) then I used an eyedropper to drip the same color blue glimmer mist on the top of the book. I blew through a straw to make them look more like stars and added stickles in the middle of each, then layered the title on top.

Michelle:I went a bit crazy with this one and got very messy (so did my table top!). Starting with a bare piece of canvas, I layered lots, and lots of acrylic paint. Once dry, I added some graffiti-style lettering with a black sharpie. And if that wasn't enough, I used a few squirts of spray paint. A machine-stitched border finishes the page. I have to admit this style is a bit out of the norm for me, but it was very freeing to let go, get messy, and have fun! A play-by-play is blogged at Life Made Creations.

You've got 2 weeks to link us up to your creation. :)

Monday, January 12, 2009

Mist with April Foster

Last month, the stitching challenge was hosted by Scarlet Namvong. She mentioned being one of two creative directors at Studio Calico. I am the second half of that duo

My name is April Foster. I was born in Texas, relocated to Tennessee, and later Kentucky, so watch out, I have a killer Southern accent! I became interested in scrapbooking in high school in a school club where I was the Historian. From there, it’s become my hobby, obsession, and major part of my life. I love that I am able to meet so many amazingly talented and inspiring people through this hobby and that it has caused me to continue to challenge myself creatively.

So, now I want to challenge you to use Spray Mists in your scrapbooking. Here’s what I like about them:

-- They’re relatively inexpensive considering the number of uses you will get out of them (~$7 for a 2 oz bottle which so far hasn’t run out for me)

-- They give you a way to stretch your embellishments and alphabets

-- They can be used to give your projects a funky look (I’m a very linear scrapper, so anything to make my layouts look new and exciting is a plus for me)

-- If you don’t like painting chipboard with a brush, this is a wonderful alternative (You can see more about this on the video-tutorial on my blog)

-- They dry very quickly, so it makes for faster scrapbooking

SORRY FOLKS, APRIL'S LAYOUT HAS BEEN REMOVED FOR PUBLICATION!

For an AWESOME tutorial on using these mists, see April's blog at: http://aprilfoster.blogspot.com/2009/01/maya-mist-tutorial.html

Here is what the team did with the challenge:

DEB:

BRENDA:
JENNIFER:


PAMELA:

Ok, you have seen the challenge. Now get out those sprays and go for it! You have 2 weeks to complete this challenge. Please post here by midnight on Sunday, January 25th to be considered for a RAK. Enjoy!

Tuesday, December 30, 2008

Challenge #35 - Simply Ir-resistible!

This challenge is to use good old-fashioned "resist" techniques on your page...

Crayon texture resist (like you did in elementary school), with the addition of a water-based second step, such as watercolor paints or wide waterbased markers, is a good simple way into this technique!... (My basic directions for the simple process I use follow.)

First... I use white or light colored Crayola Construction-paper Crayons and either write free-hand on watercolor paper or cardstock, as I did in both of these examples, (or I use a texture board---homemade, found, or store-bought---on a thinner paper, to create texture) for my first step.

Second... I use Crayola Watercolors, Crayola Water-based Markers, watersoluable crayons, or Twinkling H2Os for my second step. I pat them to help them dry and control the "puddling", and/or polish them a bit from the top of the crayon layer, as with the markers.

That's it! It's super easy, and can be SUPER-FREEING!! Fun and artsy are the name of the game here!...

And, yes... There are other types of resist techniques... Such as embossing ink/stamp/powder and dye-based ink OR rub-ons and dyebased ink, for example... But, I am looking for good old-fashioned CRAYON RESIST here, when I look for the winner of this challenge... Yes, I am pushing you to get a bit messy and HAVE SOME KID-TYPE FUN!!!... So... GO PLAY!! Loosen up and get artsy!!

You have until 12 midnite on January 12th to post a link to your page... I will pick a winner (for a RAK from me), post a slide show that week, and leave love for everybody who "walks on their wild artsy side"!! (Please post your links connected to this post... It makes finding your art a lot easier!)

In the mean time, I am posting two examples of my own... Time Flies---big written crayon words and marker, and Real Love Stories---big written crayon words and Twinkling H2Os... PLUS, you will find a very cool example of crayon resist, from Jennifer, that uses crayon drawn stripes and watered down acrylic paint... In addition, Deborah has supplied us with an example of an alternative resist process, using embossing/stamping supplies and watered down acrylics, to create the snowflake embellishments... That way, once you've got that Ir-resistible "bug", you can keep experimenting!!


PAMELA's layouts...


JENNIFER's layout...


DEBORAH's layout...

Monday, September 8, 2008

Challenge #27 - Working in Wet Paint

I LOVE getting messy when I scrap!!! And, I hope to get you all addicted to being more artsy too! So,...

I am challenging you to just play or reverse stamp in wet acrylic paint, with regular stamps or found objects... like bubble wrap, kitchen tools, old thread spools, fingers, etc... (TIP: The paint can be made more transparent and wetter longer, with the addition of a gel or gloss medium too!)

The idea is to lift the wet paint and/or play in the wet paint to create patterns and textures. (TIP: If you paint a surface first, allow it to dry, then do the wet/lifting technique, you will get cleaner shapes and lines, and a different result than one layer of paint.)

How can this process/experimentation be used??

It can be used to create background paper, as I did.... It can be used on a big element, like a huge chipboard letter or frame... It can be used on a transparency, as long as you allow for longer drying time... Etc... (My example and detail photo are included below, along with the AWESOME examples our DT achieved!!!)

The possibilities and applications are endless! Have fun, and MAKE ART! And, please link YOUR FAB results to this post by Sunday, September 21st for a chance to receive a WONDERFUL RAK from me!... Pam


Pamela's Layout & Detail:


Becky's Layout:


Paloma's Layout:


Jennifer's Layout:


Deb's Layout:


Brenda's Layout:

Sunday, December 2, 2007

Challenge 7 - Use a Mask

Ok, everyone, I know that Halloween is done and the candy is (probably) gone, but I'm giving you one more chance to use those masks.... scrap masks, that is.

Masks are very versatile. Many of you probably own them (like the ones Heidi Swapp makes), but if you do not have your own stash, fear not! They are super easy to make also. Some ideas:

* Lightly stick some stickers (letters or shapes) on a page and then ink over them. Remove the stickers and voila, you have used a mask
* Print or draw a shape unto cardstock or a transparency and cut around it. Put non-permanent sticky stuff on the back of the shape (like a photo corner) and then place it on the layout. Ink and then remove the shape. Easy as pie.
* Use a punch to make a shape and then use that shape as suggested above. (That is what I did on the upper right of my layout)

Remember that all kinds of mediums work with masks... Stamp ink, paint, chalk, crayons... sky is the limit.

As always, show us what you've got. You have 2 weeks (until Sunday, December 16th) to post your creation. It can be a layout, a card, a project... whatever. Have fun! Link here or at the posts at http://www.scrapbook.com/ (in the challenge section) or at http://www.twopeasinabucket.com/ (in the pub) to be considered for a RAK.


We are also very pleased to bring you our first FEATURED ARTIST for this challenge. Please welcome Sherry Steveson to Method Playground. Sherry is a fellow HMer and is author of two books: "When Life Gifes You Lemons; turning sour photos into sweet layouts" (coming out in the Summer of '08) and "The Scrapbooker's Embellishment Handbook" (coming out in the Spring of 2009). Check out her blog at: http://sherrysteveson.typepad.com/my_weblog/. We are thrilled to have her play with us!

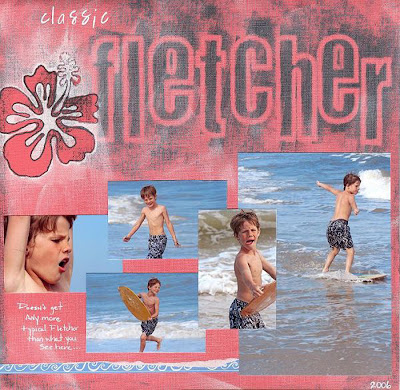
For Sherry's layout, she used Heidi Swapp mask letters and a flower. Using black paint, she covered the masks so that the black highlighted the letters and flower. She then used white stazon ink and covered the entired title to 'soften' the look. She rounded out this page with multiple photos of her son Fletcher in classic moments and tore Heidi Swapp tape to embellish.


For my (Jen's) layout, I used two different mask techniques. For the flowers, I used a Heidi Swapp mask and painted around the flowers with pink acrylic paint. I also made a homemade mask in the upper right by punching out circles of scrap paper and temporarily adhering them in an arc with photo corners. I then painted over them with acrylic paint before removing them.

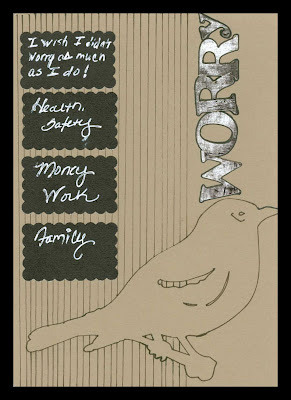
Alicia went a whole different way with her project. She used a Heidi Swapp Mask and drew lines with a thin black marker to make the outline appear in her mask. Her “layout” is actually on an XL Heidi Swapp playing card.

Becky's Layout: Becky masked the title with Heidi Swapp mask alphas, and painted over in silver, the red paper is also masked in photoshop with snowflake brushes and then printed out onto extreme boy patterned paper.

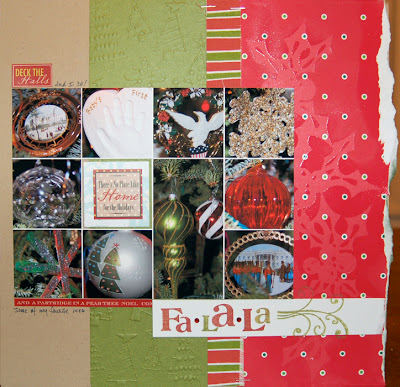
Deb's Layout: Deb also used a Heidi Swapp mask (of holly berries) on the piece of red American Crafts paper. She covered the whole piece with versamark, lifted the mask, and then embossed with clear embossing powder.