Tuesday, May 18, 2010

Challenge #68 : Love Antique.

So, next challenge is………………….. antiqueness !

I love antique and vintage taste so much. I love old paper, score, dictionary, ribbon, bottom, toy, fabric, of cause photo. And then, let’s try antique process as you like way. Example is using coffee or tea on paper or fabric etc, if you don’t have a kind of walnut inks you can use same way. I always use coffee or tea. But I think anything is ok in kitchen or somewhere. Please try and enjoy yourselves new easy way. It’ll not be same but you can enjoy accidental meeting at every moments. Also, sand paper or stone are very useful tool for it. I’m interested in waxwork, too.


Miwako:

I used a baby photo which was taken 40 years ago. (It was me!) This photo has naturally changed to feel past time, and then, I can use my finger only for distress because the paper becomes so weak. Also, I soaked jurnaling card and gaze into TEA. I used tea bag to get same color on 12inch paper, please see my blog if you want to know more details of the tecuniques. And dripped some vanilla essense at randam for the stains. You see the center letter paper and labels take waxwork,too. One buttom, ribbon and paper bobbin are real vintage.
one more layout of same taste. My process (using tea bag and stains) which is almost same my both layouts is up in my blog, please click and see it! 


KIMMY:

My aunt found this photo of the ship my grandpa served on in the navy and told me an interesting story to go with it that demanded to be scrapped. I used paper from Girls Paperie & LOTS of primas.

Deborah:

I used tea to stain some white paper and fabric flowers and ended up drying them with my heat gun to go along with this photo of me & my brothers from the 70's.


Michelle:
I used flea-market-found vintage trim, a doily, and a handwritten letter along with a photo of my grandmother as a little girl.  Couple that with a handmade book-page flower for an antique touch.  Detail shot on my blog.


Paloma: 


Sunday, May 9, 2010

Office Supply Winner!

The winner of the Office Supply Challenge is...
Yvonne Yam for her LO "Almost a Man"
Yvonne email me and I'll get your kit to you! : )


Thanks to all who participated. Lots of lovely layouts!!!


~Kimmy

Tuesday, May 4, 2010

Challenge #67: Fill your Pockets!

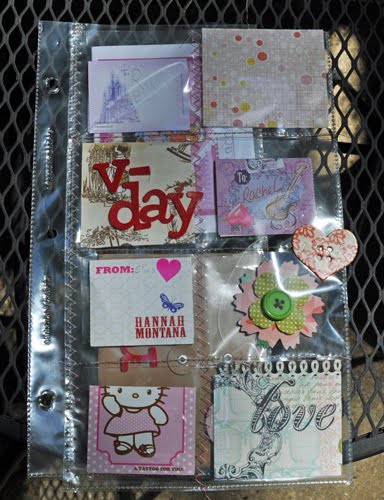
For this week's challenge, we're asking you to create your page inside a sectioned page protector: think trading card holders, sleeves for stickers, 4x6 photo holders, etc. If you don't have any of these on hand, you can create pockets by stitching a regular page protector and cutting open the top layer to add your elements. Fill the pockets with photos, journaling, accents, and memorabilia. But don't stop there. Go ahead and add more embellies (or even your title) on top of the protector. Have fun and link up your pages here by Monday, May 17 to be entered into a random drawing for a RAK. Details on that soon.

Get inspired by these creations from the design team:

Michelle:


I used a page protector designed to hold stickers and embellies. After fitting in all the photos and papers, I added the title, some epoxy stickers, chipboard stars, brads, and journaling spots to the top of the protector.

Kimmy:


I bought this sectioned photo holder awhile ago with the intention of doing this with it, but never got around to it until now. I used most of the pockets to house photos, but created embellished cards to fill the rest. I used some Hambly lace transparencies inside of some pockets, allowing the wall to show through. Some of the elements on the embellished cards are outside the plastic. For example: the rhinestones, buttons, flowers, & envelope. I love how it came out! My favorite thing about it is that I can swap the photos out since I made the cards generic.

Deborah:

I used an 8x8 page protector for this project I used my sewing machine to make the three pockets on the protector, then filled them with paper and a crochet sample I made learning a new stitch. I decorated both the outside and inside of the pockets.

front:
back:

This project was inspired by Shimelle's Something for Almost Nothing online class. I used two different American Crafts page protectors -- a 6x12 and a 10x12 sized to hold five 4x6 photos. I cut the right side off the 12x12 protector and sewed it behind the 6x12 one. I sewed six pockets on the 6x12 one, sized to hold some of the valentines my daughter got from school this year. The rest of the valentines are in the Maya Road kraft envelope.

front:
interior:
back:
Miwako: I use 12 inch protector (fancy pants) for packing newborn baby dress of my daughter. I had seen such paking idea at Ali Edwards Blog for her baby's album project. I've been thinking to try that idea...the time has come!! This dress is fasten only 2 points on protecter because I want to very easy for packing off  to use if my daughter has baby in future. Also, photos, jounaing card, tags which was real used on my list and baby are fixed by pins and I put stickers on protecter directry. Finaly, saw the top of the protecter using embroidery thread and 2 bows are blineding the end of thread.

Sunday, May 2, 2010

Challenge 64 - Cardboard - WINNER!

Sorry for the delay! Turns out when you buy your first house, the rest of your life comes to a halt for a few weeks!

Without further ado, Sharmaine Kruijver, you are the winner of the cardboard challenge! I loved your original take on cardboard flowers. E-mail Me with your mailing address and I will send you your prize.

Thanks everyone who participated!

Thursday, April 22, 2010

Office Supplies

Our next challenge is to use office supplies creatively on your LO: paperclips, staples, notebook paper, grid paper, calendar grids, binder clips, post it notes, envelopes, etc....Have fun with it!

Kimmy:

I tried to limit my supplies to JUST office products. I used very few scrapbook products on this page. The background is office inspired paper by October Afternoon which I used a padded envelope to stamp on with black paint. Other office supplies used include: yellow legal pad, 2 envelopes, 2 stamps, giant paper clips, white out, a CD, a binder clip., a file folder tab, a page from a planner, a label sticker and a date stamp.

Michelle:
Office supplies are the perfect accents to a page about the first day of school. On this LO, I used graph paper in place of patterned paper, a manilla folder tab to hold the title, staples to attach the ribbon, a paper clip and binder clip as embellies, an index card for a journaling block, a manilla shipping tag stamped with a library card as an accent, a metal rimmed tag to top off a ribbon flower, and a sticky label to write some deets.

Paloma:

I love office supplies! For this layout I used a red index card with letter P, white out here and there, round protectors, labels,tags, staples, clips, a calendar page to date the photo and blue fluorescent pencil around two adhesive corners!


Helga:

I made this quick and simple layout using masking tape, staple wires and a punch card.

Deborah:
I used a variety of supplies on mine: masking tape, mailing labels, binder clip, paper clip, tag, & staples. Under my button I placed a metal key ring and a round Avery label.

Miwako:
 I like grid line note. Also I found beautiful color index and date label at office supplies shop. So fun!


The prize!! This Alphabet Soup KIT from Rusty Pickle, along with some assorted office products.
Link us up to your office supply page by Sunday, May 2nd for a chance to win it!

Monday, April 19, 2010

Flower challenge entries

Here are the entries for the Flower Challenge. I'm so sorry for the delay. Thank you so much to those who submitted their entries. They were all great! It was really difficult to choose the winner.


And the winner is...

BEC

Congratulations! You will be receiving an Email from me regarding your Rak.

Monday, April 5, 2010

Welcome Spring!

It's already spring and when it is spring we always think of FLOWERS! So for my challenge I would like you to create your own flower embellishments and use it in your layout or projects. The more unique the flower is the better. Can't wait to see what you can come up with!

Helga


Here I used patterned papers and created it into rose-like flowers.

Paloma
This flower has been made from an egg box! It’s so easy, try it! Here you are the link: http://www.edenscrap.com/article-tutoriel-oeufs-avec-boite-a-oeufs-tutorial-flowers-with-eggs-box-43558014.html

Michelle:

I gathered a bit of crochet lace into a ruffle circle and added a paper rose to the center. More deets on the how-to are at my blog.


Deborah:
I made flowers by layering die cuts, buttons, brads, and fabric. For the fabric flowers I used pieces of lace, stitching a running stitch through the end and gathering together loosely. Once gathered, I wound the lace around about three times to make a layered flower. It helped to stitch the lace together in the back 2-3 stitches per layer.


Kimmy:
I made my flower with pieces of white silk. It was cut into 6 uneven circles 2 of each size, so that each set were each a little smaller than the last. Then using a candle lighter the edges were melted so they curled up. Be careful!! I kept burning myself, so my pyro friend had to finish that step for me! Then I misted each set of circles a different color, layered them, and used a decorative brad to connect them together. I topped that with an asterisk from one of the alpha sets I used in my title.


Layouts for the challenge are due Sunday, April 11th, by midnight Eastern. Next Challenge will be posted on the following Monday.