Showing posts with label Nontraditional Items. Show all posts

Tuesday, May 4, 2010

Challenge #67: Fill your Pockets!

For this week's challenge, we're asking you to create your page inside a sectioned page protector: think trading card holders, sleeves for stickers, 4x6 photo holders, etc. If you don't have any of these on hand, you can create pockets by stitching a regular page protector and cutting open the top layer to add your elements. Fill the pockets with photos, journaling, accents, and memorabilia. But don't stop there. Go ahead and add more embellies (or even your title) on top of the protector. Have fun and link up your pages here by Monday, May 17 to be entered into a random drawing for a RAK. Details on that soon.

Get inspired by these creations from the design team:

Michelle:


I used a page protector designed to hold stickers and embellies. After fitting in all the photos and papers, I added the title, some epoxy stickers, chipboard stars, brads, and journaling spots to the top of the protector.

Kimmy:


I bought this sectioned photo holder awhile ago with the intention of doing this with it, but never got around to it until now. I used most of the pockets to house photos, but created embellished cards to fill the rest. I used some Hambly lace transparencies inside of some pockets, allowing the wall to show through. Some of the elements on the embellished cards are outside the plastic. For example: the rhinestones, buttons, flowers, & envelope. I love how it came out! My favorite thing about it is that I can swap the photos out since I made the cards generic.

Deborah:

I used an 8x8 page protector for this project I used my sewing machine to make the three pockets on the protector, then filled them with paper and a crochet sample I made learning a new stitch. I decorated both the outside and inside of the pockets.

front:
back:

This project was inspired by Shimelle's Something for Almost Nothing online class. I used two different American Crafts page protectors -- a 6x12 and a 10x12 sized to hold five 4x6 photos. I cut the right side off the 12x12 protector and sewed it behind the 6x12 one. I sewed six pockets on the 6x12 one, sized to hold some of the valentines my daughter got from school this year. The rest of the valentines are in the Maya Road kraft envelope.

front:
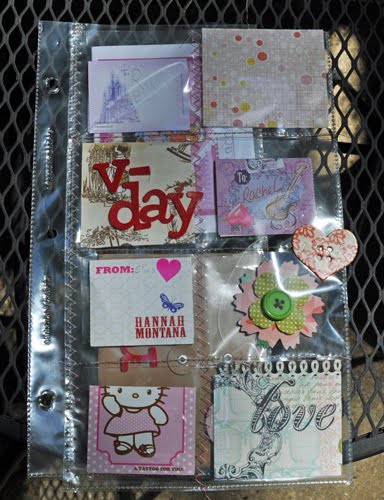
interior:
back:
Miwako: I use 12 inch protector (fancy pants) for packing newborn baby dress of my daughter. I had seen such paking idea at Ali Edwards Blog for her baby's album project. I've been thinking to try that idea...the time has come!! This dress is fasten only 2 points on protecter because I want to very easy for packing off  to use if my daughter has baby in future. Also, photos, jounaing card, tags which was real used on my list and baby are fixed by pins and I put stickers on protecter directry. Finaly, saw the top of the protecter using embroidery thread and 2 bows are blineding the end of thread.

Thursday, April 22, 2010

Office Supplies

Our next challenge is to use office supplies creatively on your LO: paperclips, staples, notebook paper, grid paper, calendar grids, binder clips, post it notes, envelopes, etc....Have fun with it!

Kimmy:

I tried to limit my supplies to JUST office products. I used very few scrapbook products on this page. The background is office inspired paper by October Afternoon which I used a padded envelope to stamp on with black paint. Other office supplies used include: yellow legal pad, 2 envelopes, 2 stamps, giant paper clips, white out, a CD, a binder clip., a file folder tab, a page from a planner, a label sticker and a date stamp.

Michelle:
Office supplies are the perfect accents to a page about the first day of school. On this LO, I used graph paper in place of patterned paper, a manilla folder tab to hold the title, staples to attach the ribbon, a paper clip and binder clip as embellies, an index card for a journaling block, a manilla shipping tag stamped with a library card as an accent, a metal rimmed tag to top off a ribbon flower, and a sticky label to write some deets.

Paloma:

I love office supplies! For this layout I used a red index card with letter P, white out here and there, round protectors, labels,tags, staples, clips, a calendar page to date the photo and blue fluorescent pencil around two adhesive corners!


Helga:

I made this quick and simple layout using masking tape, staple wires and a punch card.

Deborah:
I used a variety of supplies on mine: masking tape, mailing labels, binder clip, paper clip, tag, & staples. Under my button I placed a metal key ring and a round Avery label.

Miwako:
 I like grid line note. Also I found beautiful color index and date label at office supplies shop. So fun!


The prize!! This Alphabet Soup KIT from Rusty Pickle, along with some assorted office products.
Link us up to your office supply page by Sunday, May 2nd for a chance to win it!

Monday, March 22, 2010

Thinking OF the box: CARDBOARD

Challenge 64 is to use cardboard on your layout... stamp with the corrugated edges, die cut it, pull it apart and use it for texture, whatever you can think of!

A couple of notes. There are two general types of cardboard floating around out there: the type used to make boxes and the type not used to make boxes. Because boxes need strength, the cardboard used to make boxes has a smaller (tighter) corrugation and heavier-duty glue. This type of cardboard is much harder to pull apart. I like to use the white cardboard presentation boards sold at craft and office supplies stores. For one, they're cheap. For two, when you pull it apart, you get a corrugated surface, a kraft paper surface, and a white paper surface. For three, this type of cardboard is really easy to pull apart for its separate layers. I like to use a rotary cutter to cut my cardboard to size.

Cardboard is not archival safe, so, never use one-of-a-kind original photos with it. But that is no reason not to use it at all! If you are really concerned, don't place your photos such that they are touching the cardboard on your layout (if you look at my layout below, you'll notice my photo is matted, and therefore not touching the cardboard).

One person will be chosen to win Marthe Le Van's "Stencil Me In" (a $25 value!) for entering this challenge:
Winner of the RAK will be posted on Monday, April 5.

Layouts for the challenge are due Sunday, April 4th, by midnight Eastern. Next Challenge will be posted on the following Monday.

Have fun! - Amanda


Now....to the inspiration:


Amanda: I used white corrugated cardboard (see intro paragraph) to create a tear-away storybook look on my layout. The white lined paper (where I drew the Mad Hatter scene) is one layer of cardboard and the brown corrugated paper is another.

Paloma: I used cardboard in three different ways: as an embellishment (the flower vase!), as a stamp (on the cardstock) and as a paint brush (notice the drops of paint?).


Miwako: I want to up 2 layouts. At first, I made boder accent and a kind of flame for photo mat.


Next, I used cardboard as 12 inch paper. I peeled it (leaved around center) at first and painted white. I always can't clean up any box because my cats love staying into box especially cardboard box, also at now....my twins join to scrambled for it, OMG!

Helga: I cut the cardboard into a heart shape then created a hanging layout of my niece and her child.

Kimmy - I used corrugated cardboard as borders on my page.


Michelle:


I ran some cardboard through a die cutting machine, spray painted the flower shapes, peeled away some of the paper to reveal the corrugation, and embellished with buttons and a few swipes of a dry brush.

Deborah:
I also used cardboard as my paper. I peeled away some of the paper, then used a combination of dry brushing paint, spraying Glimmer Mist, and swiping on a bit of rock candy distress paint.

Monday, March 8, 2010

White Out!

Kimmy:

Hybrid page. I printed out some digital papers & labels (Audrey Neal-Sistv & MissMint) for this one. I used the white out as paint. I used lace tape as a mask (it was bright pink before) on black cardstock & used both the positive & negative images on the LO. I also painted the letters and buttons with white out. Sketch from Sketchy Thursdays. Amanda -


For this challenge I created an art journal page. I used white out tape to create journaling spots on my page. I like the slightly distressed look the white out tape gave me. It worked well because it seemed willing to stick to all the different layers of may page (the bird is a photo transfer).

Miwako: I used white out tape for points of layout design. It was scratched to make naturaly using edge of scissors. Also, I used white out pen for words on photos, too.

Deborah:


I ran a scrap of cardstock through my Cuttlebug, then used a Tim Holtz foam applicator to swipe the white out over the embossed image. I also ran several lines on my page for journaling. I tried to stamp with the white out, but the stuff dries too darned fast!


Michelle:

I used white out tape to write the letters in my title, and ran a few lines to hold my journaling.

Monday, January 11, 2010

Challenge #59: Go Green

It's a brandy new year, filled with lots of new goals, resolutions, and good intentions. Let's start the new year off by going green! I'm not talking color here (although green is one of my faves!), I'm talking upcycling. Before you toss that cereal box, junk mail, or product packaging, take a second look. What wonderful piece of art could you create with it? What fabulous accent could you fashion to embellish your next layout, card, or project? You have two weeks to link up your upcycled project in the comments here. Up for grabs: a super comfy slipcover for your camera strap. Deets to follow later this week. Have fun creating your projects, and be happy that you're doing something great for our Earth, too!!


Miwako:
[inside]I reuse a small paper box (size: 7x4.5 inch) using as gift package of tea. I'll use this decolate box as a keeper of ATC (exchanged with my friends). This upcycle is very easy way as you can make decolate box, just choice favorite paper (or fabric) and wrap the basement, and then add some embellishments on it.
I've just moving my brog to http://chichin-puipui.blogspot.com/
this linked post is http://chichin-puipui.blogspot.com/2010/01/mp59-go-green.html

Amanda:


This 2-page layout includes 3 upcycles - 1) the denim background was actually cut from a pair of "well loved" jeans, 2) the circle background was cut from a brown paper shopping bag, and 3) the title letters were cut from a newsprint magazine.

Michelle:
The embellishment in the lower left of the photo was made from the plastic packaging from Basic Grey's magnetic snaps. I used alcohol inks to color each one and then drew swirls with a Sharpie pen--easy peasy (and free!)


There are a few upcycles going on in this LO. The bracket is cut from a cardboard coffee cozy. The letters s and c were cut from the leftover negative of the alpha sticker sheets--these would have otherwise ended up in the trash bin. The tree was stamped onto a piece of cellophane packaging and cut out.


Kimmy:

I took this Christmas gift card tin and gave it a makeover with the new kit from Scrapbook Get-Away. Now I can reuse it for a birthday! :)


Deborah:


This layout uses several upcycles, too. The background is a paper bag cut to 12x12. I ran a strip of the bag through my cuttlebug and inked it for a strip of paper (lower left). I also grabbed two things out of my recycling bag - a paper towel roll and the plastic top of a spice jar and used them to stamp circles on my patterned paper.


Paloma


I love strips on the bottom of the papers, with trade mark, collection name and code bar. I use to keep them on a plastic bag because i don't like to put them through away, they are so cute! Here you are some of them around a pic showing my scrap table when I'm working on a layout!

Helga


I also used the label strips from my patterned papers. I used them as flowers and stems for flowers.

Monday, November 30, 2009

Challenge 55 - Using Negative Space

This weeks challenge is to design using negative space. You know, the "outside" of die-cuts, the "backing" of chipboard letters, the "other part" of stencils. You can use the "actual" piece of negative space on your layout, or use it like a stencil with spray ink, paint, etc. You could even journal within negative space. Here's what our Design Team came up with:

Amanda -

I created a stencil using a photo. I then spray inked the "negative space" around my stencil, which included the shadows in the photo, to create a background. I then used some of the white space in the spray inked image as a place to put my photos and title. A complete "how-to" for the background will be available on my blog after this post goes live.

Helga P. Vergara -I used the backing of my chipboard embellishment set as a frame for my photos.

Kimmy
I used the negative space from some Maya Road chipboard people as a reverse mask to create my lady on the right. I covered the man shape with paper and then sprayed glimmer mist into the lady shape. After it dried I outlined it with a pen to give it more definition, then I decorated it. I also used the negative space from the chipboard 3 in my title as an accent near the photo. Made mainly with the Fall Bliss Kit from Scrapbook Get- Away.

Michelle -

I used the backing from a sheet of chipboard letters and painted it in two tones of green. The circles are the perfect spots to place photos, papers, and embellishments. The letter E is also a leftover chipboard negative.

Deborah -

I used the edge from a bracket sticker to frame a piece of patterned paper. I also used the negative space from the chipboard arrow as a mask to ink a few arrows along the bottom of my patterned paper.

Now it's your turn! Can't wait to see what you come up with.

Monday, August 10, 2009

This fortnight’s topic : the masking tape !

Hi everybody ! Time for a new challenge technique!
Ever thought about using some… masking tape ? That’s right, that’s our challenge : to use this paper-like tape everywhere or anywhere on your layout. You could cut it into pieces that you then put on the background, or use strips of it with some gesso on it or you can tape your photos with it on the cardstock… Use your imagination ! Want some more ideas ? How about using the masking tape to write on it or paint it ? It’s all up to you !

By the way, here is what I did with it ! Have fun… till 23th august at 00.00!

Monday, July 27, 2009

Challenge 50 - Cookie Cutters

While you're waiting for all the new CHA goodies to hit the stores, let's find a few "new" things to do with your current supplies. Everyone's got at least one cookie cutter lying around - right? Well, let's get creative with them!

Your challenge is to use cookie cutters in creating your layout. You can interpret that however you wish. Tell us how you used them when you link up your layout.

Are you kids getting restless? Put them to work, too! Give them some cookie cutters and playdoh or let them make their own creation along side you.

Just link up your layout by Sunday, August 9th to be eligible for a RAK. Since it's summer and taking the kids anywhere takes me three times a long, I'm going to give one lucky participant a gift certificate to Studio Calico.

Here's what the team did:

Deborah:

I had several star cookie cutters in different sizes, including a large one. I used them two ways: stamping onto paper with Tim Holtz's Distress Paint and tracing around them and making Shrinky Dinks. I chose to use Distress Paint because it comes with it's own brush and it was easy to "paint" the edges of the cutter. For the smaller Shrinky Dinks, I stamped them with Staz-on ink before shrinking.

Monday, June 15, 2009

Challenge 47

Hi, girls !

New fortnight, new assignment ! For this particular assignment, we want you to use anything ranging form napkins to tissue paper, kitchen paper or toilet paper. How’s that ? You have 15 days as usual for this assignement. The final deadline is 28 June.

Here’s what the DT has done :

1) Pamela

The background paper is created with tissue paper, gloss medium, paint, and ink.)


2) Jen

She twisted tissue paper and then wound beaded wire around it to shape it.


3) Paloma

She used pieces of napkins to create a foggy city (look at behind houses…).


4) Deborah

She used tissue paper to create flowers, then sprayed them with Maya Mist and Glimmer Mist

5) Brenda
She used tissue paper as a ruffle - stitching it on with the sewing machine.
So what do you think ? Are you up to par ? Thanks to submit till Sunday 28th at noon !

Greetings