Journaling is an essential part of a layout. Usually, you put it around your pics: on the top, on the bottom, on the right or on the left, anywhere. This time I challenge you to write the journaling ON your photo(s)! Yep! That's it! It’s easy, it’s fun and you have a lot of possibilities. You don’t believe me? Look at what the DT members have done for you:
Jen: Instead of writing on the photo, she enlarged and printed the photo and then she used a set of those tiny stamps on wood blocks: one by one! It didn’t take more than 20 minutes. No Photoshop needed for that one. Pretty simple, isn’t it?
Brenda: She wrote her thoughts in a bubble and stuck it on the photo! She added additional lines on a tag outside of the photo.
Pam: The text was written on the photo first, then she stamped it on the paper... Actually, the photo was printed on that paper right in the middle, and she simply added everything to the photo paper! Easy as pie!!
Deb: this layout has a large photo but she journaled on it via PS before printing it out.
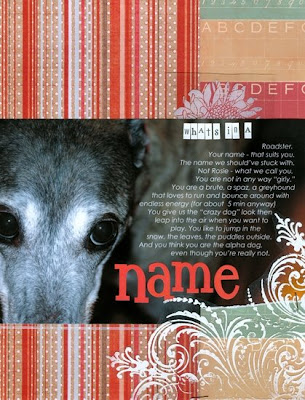
Paloma: She simply applied some rubons on the photo because her hand-writing is so awful. That’s just too easy, don’t you think?
Now is your turn! How do you manage to write your journaling ON the photo? Leave your link in your comment. Deadline: February 8th at 12 p.m. Thanks a lot!
Monday, January 26, 2009
Saturday, January 24, 2009
Slide show and WINNER for Challenge #35 - Simply Ir-resistible!
Thank you ladies for ALL OF YOUR FAB ARTWORK!!!
As always, it was a tough decision, and after some deliberation... I have chosen...
JENNIE as this challenge's WINNER!!! Love your sweet "Little Dreamer" page!! (Please e-mail me at pamelapalmarini@hotmail.com with your addy, and I will send out your RAK ASAP!!
Thanks again everybody, for getting a bit messy, and trying something new with us!!!
Wednesday, January 14, 2009
Mist RAK
OK, folks... just in case you need some incentive to get out those mists, check out this RAK from April Foster and Studio Calico!
This January add-on project kit is valued at $41 and includes the following:
PATTERNED PAPERS: Animal Friends (Cosmo Cricket); Blankey (Cosmo Cricket); Playtime (Cosmo Cricket); Wake Up (Cosmo Cricket); Louie (October Afternoon)
EMBELLISHMENTS: White Grid Panorama Window Chipboard Album (Scenic Route); Retro Mix Blackboard Alphabet (Cosmo Cricket); Playtime Alphabet Rub-Ons (October Afternoon); Jack's World Blackboard (Cosmo Cricket); Jack's World Adhesive Die Cuts (Cosmo Cricket); Urban Prairie Buttons (Basic Grey); My House Everyday Felt Flowers (American Crafts); Night Light Cardstock Stickers (October Afternoon); Haute Cosmo 2 Ribbon (American Crafts); Giraffe 3 Ribbon (American Crafts); Alligator 4 Ribbon (American Crafts)
To check out more photos, go to:
Monday, January 12, 2009
Mist with April Foster
Last month, the stitching challenge was hosted by Scarlet Namvong. She mentioned being one of two creative directors at Studio Calico. I am the second half of that duo
My name is April Foster. I was born in Texas, relocated to Tennessee, and later Kentucky, so watch out, I have a killer Southern accent! I became interested in scrapbooking in high school in a school club where I was the Historian. From there, it’s become my hobby, obsession, and major part of my life. I love that I am able to meet so many amazingly talented and inspiring people through this hobby and that it has caused me to continue to challenge myself creatively.
So, now I want to challenge you to use Spray Mists in your scrapbooking. Here’s what I like about them:
-- They’re relatively inexpensive considering the number of uses you will get out of them (~$7 for a 2 oz bottle which so far hasn’t run out for me)
-- They give you a way to stretch your embellishments and alphabets
-- They can be used to give your projects a funky look (I’m a very linear scrapper, so anything to make my layouts look new and exciting is a plus for me)
-- If you don’t like painting chipboard with a brush, this is a wonderful alternative (You can see more about this on the video-tutorial on my blog)
-- They dry very quickly, so it makes for faster scrapbooking
SORRY FOLKS, APRIL'S LAYOUT HAS BEEN REMOVED FOR PUBLICATION!
For an AWESOME tutorial on using these mists, see April's blog at: http://aprilfoster.blogspot.com/2009/01/maya-mist-tutorial.html
Sunday, January 11, 2009
Winner of Stitching Challenge
From Scarlet:
Congratulations to Debra Lynn! I almost gasped when I saw the bird and branch that she stitched on her "Lucky Day" layout. I'd love to know your secrets, Debra! Did you draw the bird free-hand or did you use a pattern? Spill it, girl! And the circle that frames the title is just the perfect touch... so very fabulous. Thanks so much to everyone who participated in this challenge. I hope you enjoyed it!
We agreed, Scarlet - absolutely lovely. Here is the layout in proper (non-sideways) form. I goofed in the slideshow.
Debra Lynn, please email us (click link on right) with your address and Scarlet will get that wonderful Studio Calico kit out to you.
Sunday, January 4, 2009
Challenge 34 Slideshow is up!
Thanks to all who participated in Scarlet's Hand Stitching challenge. Check back soon to see who will be receiving that gorgeous RAK!
Subscribe to:
Posts (Atom)